by cod2war on 29 September 2021 - 367 views - 0 comments
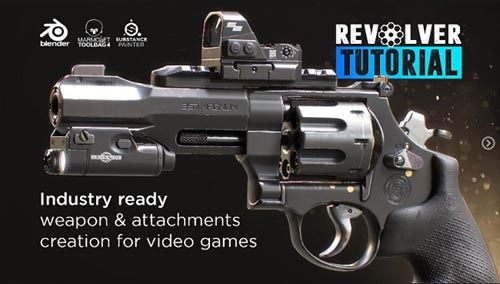
Artstation - Revolver Tutorial - Industry Ready Weapon & Attachment Creation for Video Games

Artstation - Revolver Tutorial - Industry Ready Weapon & Attachment Creation for Video Games
Duration 19h Project Files Included MP4
Info:
INCLUDES:
19 HD Revolver Tutorial Video Files ~ around an hour per video.
+ 1 HD Introduction to Blender Video 2h long (for those completely new to Blender)
Essential reference images
Full audio commentary in English
ABOUT THE REVOLVER TUTORIAL
Hello everyone! I am happy to share with you an all new, state of the art weapon tutorial featuring Blender as well as Marmoset Toolbag 4 and Substance Painter for baking, texturing and portfolio ready renders. Create a customizable revolver together with two mountable attachment pieces for it: a flashlight as well as reflex scope as you would find it almost any FPS video game these days. We built the revolver fully detachable: you can even take the rail off. You won't be needing any plugins for Blender that cost money but we will install a couple of excellent free plugins. Documentation is covered in the tutorial and can be seen here in case you want to take a look.
CHAPTER 1 - BLENDER: MODELING, UNWRAPPING & BAKING PREPARATION
The tutorial starts in Blender while relying on the proven modeling techniques, modifiers, free plugins as well as careful studying reference images to make sure we catch even the smallest details.
Once we get to the highpoly part we gonna make use blender's remesher capabilities which is an amazing way to create highpoly models in a modifier based and non destructive environment and with excellent results.
After the modeling part is completed we will jump into the UV Editor and start unwrapping our mesh in order to have the perfect UV layout for out later texture. For that we make use of (free) plugins to max out our Texture Space. No pixel shall be left behind! At the end of this chapter we will prepare the low and highpoly model by making sure we have the right naming convention, smoothing group setup as well as materials assigned.
CHAPTER 2 - BAKING IN MARMOSET AND TEXTURING IN SUBSTANCE PAINTER
After the modeling part we export our high and lowpoly models over to Marmoset Toolbag 4 which has the best baking tools available. Here we will bake our base maps such as Normal, Object Space Normal, Curvature, AO, Position as well as the Thickness Map.
As we do that we will conveniently paint out any skewing that we have on some of the parts of the texture.
After that we will import our maps over to Substance Painter where create two different texture versions for the revolver: a chrome version as well as a metallic paint coated one. Learn how to create alpha textures, making use of various materials, smart materials and how to use procedural masks and generators to form up the wear and tear resulting in a photo realistic appearance.
CHAPTER 3 - PORTFOLIO READY RENDERS IN MARMOSET TOOLBAG 4
As a finishing touch we will make a short visit to Marmoset Toolbag 4 where we create portfolio ready renders, a turntable animation as well as having a quick look on how to arrange a scene in Blender and bringing it back to Marmoset for scene composition renders. This episode will be free to watch on YouTube.
WHAT ARE THE REQUIREMENTS?
It is recommended to follow the course with the same software we use throughout the tutorial: Blender, Substance Painter, Marmoset Toolbag 4 to do our bakes and renders in.
WHO IS THE TARGET AUDIENCE?
As all ChamferZone tutorials the Revolver tutorial is aimed at beginners as well as intermediate. I avoid heavy use of shortcuts so that you can see which actions I use. On top of me explaining every step you can also always pause the screen and you will see which actions I was using thanks to a key action plugin that I have running. This plugin only works for Blender but this is where it matters the most.
DOWNLOAD HERE :
https://rapidgator.net/file/4b23de6a75682379f49d134751b424c9/ArtstationRevolverTutorialIndustryReadyWeaponAttachmentCreationforVideoGames.part01.rar.html
https://rapidgator.net/file/f0f6f4789d9103bd8a4def46ae85ac93/ArtstationRevolverTutorialIndustryReadyWeaponAttachmentCreationforVideoGames.part02.rar.html
https://rapidgator.net/file/9ea160a50570fc9b2a9350860b7772f6/ArtstationRevolverTutorialIndustryReadyWeaponAttachmentCreationforVideoGames.part03.rar.html
https://rapidgator.net/file/d9aa195d56b1dcc90d98592dd447827e/ArtstationRevolverTutorialIndustryReadyWeaponAttachmentCreationforVideoGames.part04.rar.html
https://rapidgator.net/file/4b8237e1ecbe2f7e4406e05e15a2777f/ArtstationRevolverTutorialIndustryReadyWeaponAttachmentCreationforVideoGames.part05.rar.html
https://rapidgator.net/file/728fdf75ea8d00f23e29e562f179991c/ArtstationRevolverTutorialIndustryReadyWeaponAttachmentCreationforVideoGames.part06.rar.html
https://rapidgator.net/file/ca879419646aad8f1de006da039c1e89/ArtstationRevolverTutorialIndustryReadyWeaponAttachmentCreationforVideoGames.part07.rar.html
https://rapidgator.net/file/97d75cdc6089e6dcd453eae9d9dbaf01/ArtstationRevolverTutorialIndustryReadyWeaponAttachmentCreationforVideoGames.part08.rar.html
https://rapidgator.net/file/66cfe3b7633bff5474886fa9220e7c01/ArtstationRevolverTutorialIndustryReadyWeaponAttachmentCreationforVideoGames.part09.rar.html
Tags:
RELATED NEWS


